| |
|
|
| |
Insert Today's Date in Selected Cell |
|
| |
Private Sub Worksheet_SelectionChange(ByVal Target As Range)
' This will place todays date in a cell in the format dd mmm yyyy
Dim dtToday As String
' Change the column numbers to those that you want todays date in it
If Target.Column = 9 Or Target.Column = 10 Then
dtToday = Format(Date, "dd mmmm yyyy")
myDay = Word(dtToday, 1)
myDay = Replace(LTrim(Replace(myDay, "0", " ")), " ", "0")
Cells(Target.Row, Target.Column).Value = "'" & myDay & " " & Left(Word(dtToday, 2), 3) & " " & Word(dtToday, 3)
End If
Cells.Columns.AutoFit ' Autofit the columns
End Sub
|
This code will insert today's date into a cell simply by clicking the cell.
The code, as it stands, will only insert the date if the column is either column 9 or column 10.
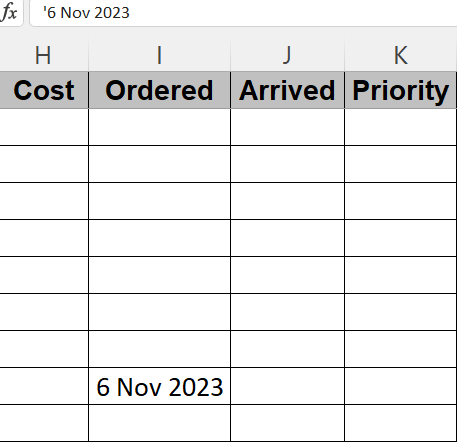
The date will be of the format "'dd mmm yyy" i.e. '6 Nov 2023.
Note that the date starts with a single quote so that the entire string is treated as a string. If you
want Excel to treat it as a date, remove the "'" & (underlined in the code to the left) from the cell value line.
In this example we clicked on cell I12.
Text Version
|
|
| |
|
|
| |
Worksheet Selection Code |
|
| |
' Ask which sheet to use
Dim SheetName As String
SheetName = InputBox("What sheetname do you want to use?")
If SheetName <> "" Then
If Not WorkSheetExtant(SheetName) Then
Dim ws As Worksheet
Set ws = ThisWorkbook.Worksheets.Add(Type:=xlWorksheet)
With ws
.Name = SheetName
End With
ActiveWorkbook.Save
MsgBox "Worksheet " & SheetName & " Created successfully"
Else
ThisWorkbook.Sheets(SheetName).Select
End If
End
Else
MsgBox "Action Cancelled"
End If
|
This piece of code will ask the user what worksheet to use.
The code is not stand alone. You will have to wrap your own code around it, but it does demonstrate how to either create the desired worksheet if it does not exist or select it if it does.
This code uses the WorksheetExtant function detailed below.
Text Version
|
|
| |
|
|
| |
Check Existence of a Spreadsheet |
|
| |
Public Function WorksheetExtant(WorksheetName As String, Optional wwb As Workbook) As Boolean
If wwb Is Nothing Then Set wwb = ThisWorkbook
WorksheetExtant = False
With wwb
On Error Resume Next
Dim Sht As Worksheet
For Each Sht In wwb.Worksheets
If Sht.Name = WorksheetName Then
WorksheetExtant = True
Exit Function
End If
Next Sht
End With
WorksheetExtant = False
End Function
|
This function will return TRUE if a worksheet exists in a workbook and FALSE if it does not
You can pass the name of a workbook to this routine and it will check that for the sheet.
By default, if you omit the workbook name it will use the workbook with this code in it.
Text Version
|
|
| |
|
|
| |
Check For a Valid Worksheet Name |
|
| |
Public Function IsSheetNameValid(SheetName As String) As Boolean
' Check for a valid WorkSheet Name
IsSheetNameValid = False
If Len(SheetName) = 0 Then Exit Function
If Len(SheetName) > 31 Then Exit Function
Dim InvalidCharacters As Variant
InvalidCharacters = Array("/", "\", "[", "]", "*", "?", ":")
Dim x As Integer
For x = LBound(InvalidCharacters) To UBound(InvalidCharacters)
If InStr(SheetName, (InvalidCharacters(i))) > 0 Then Exit Function
Next
IsSheetNameValid = True
End Function
|
This function will return TRUE if a string passed to it is a valid worksheet name and FALSE if it is not.
Text Version
|
|
| |
|
|
| |
Check Existence of a File |
|
| |
If FileExtant("fullpath of the file and the file name") Then
MsgBox "File found"
Else
MsgBox "File not found"
End If
Function FileExtant(ByVal FileName As String) As Boolean
If Dir(FileName) = "" Then
FileExtant = False
Else
FileExtant = True
End If
End Function
|
This code demonstrates how to use the included function FileExtant.
The filename (in red) needs to be the full path names and file name of the file being looked for.
The function FileExtant is available from here.
|
|
| |
|
|
| |
Check Existence of a Table on a Worksheet |
|
| |
Public Function TableExtant(TableName As String, SheetName As String) As Boolean
' Check for a Table on a Worksheet
Dim MyTarget As Worksheet
Set MyTarget = Worksheets(sheetName)
Dim MyTables As ListObject
With MyTarget
For Each MyTables In .ListObjects
If MyTables.Name = tableName Then TableExtant = True
Next MyTables
End With
End Function |
This Function can be called to test to see if a Table exists on a worksheet
If the table name does not exist then TableExtant will be set to FALSE
Text Version |
|
| |
|
|
| |
Unhide All Spreadsheets |
|
| |
' Unhide All Spreadsheets
Sub UnHideAll()
For Each ws In Sheets: ws.Visible = True: Next
End Sub
|
Unhiding all the hidden spreadsheets in a workbook really couldn't be simpler.
It can be done with one line of code. Here we have made it into a subroutine. We usually set up a hot key to call the subroutine.
This will not work on very hidden sheets |
|
| |
|
|
| |
Disabling and Enabling Excel Features |
|
| |
' Disable Excel features
Application.Calculation = xlCalculationManual
Application.EnableEvents = False
Application.ScreenUpdating = False
.
. Your code
.
' Re-enable Excel features
Application.Calculation = xlCalculationAutomatic
Application.EnableEvents = True
Application.ScreenUpdating = True
|
It is often advisable to disable Excel's autocalculate and other events for the duration of your program's execution.
The code supplied here demonstrates how to do this along with the code to re-enable it. |
|
| |
|
|
| |
Filling a DropDown List |
|
| |
Public MySearchString As String
Public MySearchSheet As String
Sub FillDropDown(ByRef MyRow As Integer, MyColumn As Integer, MySheet As String, MySearchString As String, MySearchSheet As String)
With ThisWorkbook.ActiveSheet
Set findCell = .Cells.Find(what:=MySearchString, LookIn:=xlValues, LookAt:=xlWhole)
If findCell Is Nothing Then
MsgBox "Sheet Invalid. " & MySearchString & " not found", vbCritical.
MySheet = "Whoops"
Exit Sub
End If
End With
If MyColumn <> findCell.Column Then Exit Sub
If MyRow < findCell.Row Then Exit Sub
Application.Calculation = xlCalculationAutomatic
Application.EnableEvents = True
Application.ScreenUpdating = True
|
Sometimmes it is easier (no code changes) to load a drop down box using fields from another
spreadsheet.
This subroutine will perform the task of filling a drop down from a different sheet in the workbook. |
|
| |
|
|
| |
Sorting Worksheets |
|
| |
Option Explicit
Option Compare Text
Sub SortTheSheets()
Dim B As Boolean
Dim s As String
' sort all sheets in ascending order by name.
B = SortWorksheetsByName(0, 0, s, False)
If B = True Then
MsgBox "Worksheets Sorted"
Else
MsgBox "Error sorting sheets: " & s
End If
End Sub
Public Function SortWorksheetsByName(ByVal FirstToSort As Long, _
ByVal LastToSort As Long, _
ByRef ErrorText As String, _
Optional ByVal SortDescending As Boolean = False) As Boolean
Dim M, N As Long
Dim WB As Workbook
Dim B As Boolean
Set WB = Worksheets.Parent
ErrorText = vbNullString
If WB.ProtectStructure = True Then
ErrorText = "Workbook is protected."
SortWorksheetsByName = False
End If
If (FirstToSort = 0) And (LastToSort = 0) Then
FirstToSort = 1
LastToSort = WB.Worksheets.Count
Else
B = TestFirstLastSort(FirstToSort, LastToSort, ErrorText)
If B = False Then
SortWorksheetsByName = False
Exit Function
End If
End If
For M = FirstToSort To LastToSort
For N = M To LastToSort
If SortDescending = True Then
If StrComp(WB.Worksheets(N).Name, WB.Worksheets(M).Name, vbTextCompare) > 0 Then
WB.Worksheets(N).Move before:=WB.Worksheets(M)
End If
Else
If StrComp(WB.Worksheets(N).Name, WB.Worksheets(M).Name, vbTextCompare) < 0 Then
WB.Worksheets(N).Move before:=WB.Worksheets(M)
End If
End If
Next N
Next M
SortWorksheetsByName = True
End Function
Private Function TestFirstLastSort(FirstToSort As Long, _
LastToSort As Long, _
ByRef ErrorText As String) As Boolean
ErrorText = vbNullString
If FirstToSort <= 0 Then
TestFirstLastSort = False
ErrorText = "FirstToSort is less than or equal to 0."
Exit Function
End If
If FirstToSort > Worksheets.Count Then
TestFirstLastSort = False
ErrorText = "FirstToSort is greater than number of sheets."
Exit Function
End If
If LastToSort <= 0 Then
TestFirstLastSort = False
ErrorText = "LastToSort is less than or equal to 0."
Exit Function
End If
If LastToSort > Worksheets.Count Then
TestFirstLastSort = False
ErrorText = "LastToSort greater than number of sheets."
Exit Function
End If
If FirstToSort > LastToSort Then
TestFirstLastSort = False
ErrorText = "FirstToSort is greater than LastToSort."
Exit Function
End If
TestFirstLastSort = True
End Function |
This code will sort all the worksheets in an Excel workbook into ascending alphabetic order by the name of the worksheet.
To sort it in descending order change the fourth parameter on the call (highlighted in yellow) from False to True
i.e.
B = SortWorksheetsByName(0, 0, s, True)
The code displayed here is a much more concise version of the code that we use. It is a functional, working piece of code as it is but a much more feature rich version is extant.
You will need all of the code in the example to be in your spreadsheet in order for it to work correctly.
The fully working, expanded and commented version of this code is available here.
|
|
| |
|
|
| |
Creating an Index of Worksheets |
|
|
| |
Sub IndexSheetNames()
Dim xWs As Worksheet
On Error Resume Next
Application.DisplayAlerts = False
' First sort the sheets
Dim SortAnswer As Integer
SortAnswer = MsgBox("Do you want to sort the sheets first?", vbYesNo + vbQuestion, "Sort?")
If SortAnswer = vbYes Then
Dim sCount, i, j As Integer
sCount = Worksheets.Count
If sCount <= 1 Then Exit Sub
For i = 1 To sCount - 1
For j = i + 1 To sCount
If Worksheets(j).Name < Worksheets(i).Name Then
Worksheets(j).Move before:=Worksheets(i)
End If
Next j
Next i
End If
Dim OurName As String
OurName = InputBox("Name of Index sheet?" & vbCrLf _
& vbCrLf & "(Null entry or Cancel will terminate)")
If OurName = "" Or OurName = vbNullString Then
GoTo Leaveit
End If
xTitleId = OurName
' delete any existing OurName sheet
Application.Sheets(xTitleId).Delete
Application.Sheets.Add Application.Sheets(1)
Set xWs = Application.ActiveSheet
xWs.Name = xTitleId
xWs.Range("A1") = "Sheet Name"
xWs.Range("B1") = "Comments "
' Add any other columns you may need in the index in here
' Center headings, add borders and color ithe headings
xWs.Range("A1:B1").HorizontalAlignment = xlCenter
xWs.Range("A1:B1").Borders.LineStyle = xlContinuous
xWs.Range("A1:B1").Interior.ColorIndex = 15
k = 3
x = Application.Sheets.Count + 2
For i = 3 To x
If Left(Application.Sheets(i - 1).Name, 1) = "$" Then
' Ignore sheets with names starting with "$"
Else
xWs.Range("A" & (k - 1)) = Application.Sheets(i - 1).Name
xWs.Range("A" & (k - 1), "B" & (k - 1)).Borders.LineStyle = xlContinuous
k = k + 1
End If
Next i
ActiveSheet.PageSetup.CenterHeader = "&C&24&U&B Index of Workbook " & ThisWorkbook.Name
ActiveSheet.PageSetup.RightFooter = Format(Now, "MMMM DD, YYYY HH:MM:SS")
ActiveSheet.PageSetup.CenterFooter = "Page &P of &N"
ActiveSheet.PageSetup.CenterHorizontally = True
Application.DisplayAlerts = True
Columns("A:B").Select
Selection.EntireColumn.AutoFit ' autofit headings
Columns("A:B").Deselect
LeaveIt:
End Sub |
This code will build an index of all the sheet names within an Excel workbook
The code will now prompt to ask if you want to sort the worksheets into alphabetic order before it builds the index.
If you choose to not sort the sheets before indexing then the index will be in the order that the sheets are in the workbook.
If you want any additional columns defined in the index sheet place the code where the yellow line is.
The format of these is exactly like the lines for cells A1 and B1. Simply move up the alphabet for additional columns.
i.e
xWs.Range("C1") = "Next Column"
If you want the additional lines to have a border around them then change the range statements accordingly.
i.e.
xWs.Range("A1:C1").HorizontalAlignment = xlCenter
xWs.Range("A1:C1").Borders.LineStyle = xlContinuous
xWs.Range("A1:C1").Interior.ColorIndex = 15
You will also need to change the following line too.
xWs.Range("A" & (k - 1), "C" & (k - 1)).Borders.LineStyle = xlContinuous
If you want the new columns to be autofitted then you will additionally need to change these lines too.
Columns("A:C").Select
Columns("A:C").Deselect
If you always want the Index Sheet to be called the same name then you could simply comment out the InputBox code.
We use $$$INDEX as the name of the index sheet. We do this so that when the work sheets are sorted the $$$INDEX sheet is at the front.
To do this just follow the instructions in the code supplied here.
Once the index is built you may want to re-sort the worksheets. |
|
| |
|
|
| |
Placing a Graphic in an Excel Header |
|
|
| |
ActiveWindow.ActiveSheet.PageSetup.CenterHeader = "&C&36&U&B " & " Title Text"
With ActiveSheet.PageSetup.LeftHeaderPicture 'Set to left header area
.Filename = "your path to image\image.png"
.Height = 100
.Width = 150
.Brightness = 0.36
.ColorType = msoPictureAutomatic
.Contrast = 0.36
.CropBottom = 0
.CropLeft = 0
.CropRight = 0
.CropTop = 0
End With
' Enable the image to show up in the left header.
ActiveSheet.PageSetup.LeftHeader = "&G" |
Sometimes it is desirable to incorporate a logo or picture into the header of a spreadsheet. To accomplish this use this code.
The code will actually set a central text title and a graphic to the left of it. To place a graphic to the right side, simply substitute RIGHT for LEFT in the code.
The code &C&36&U&B tells Excel that the font is centered, 36 pitch, underlined and bold. |
|
| |
|
|
| |
Dropping The First Word From a String |
|
|
| |
Dim StrLen As Long
Dim StrPos As Long
Dim OurString As String
OurString = "Never Give up"
MsgBox OurString
StrLen = Len(OurString)
StrPos = InStr(1, OurString, " ")
' Drop off the first word from OurString
If Not StrPos = 0 Then
OurString = Right(OurString, StrLen - StrPos)
End If
MsgBox OurString
|
This code technique can be used to drop elements from a string. It does no checking for a valid input string as it is only intended as a demonstration.
There may be several different ways of performing the same function but this one works just fine.
Note: The error checking statement
If Not StrPos = 0 will prevent an error if OurString originally contained only one word.
|
|
| |
|
|
| |
Eliminating a #DIV/0! Error. |
|
|
| |
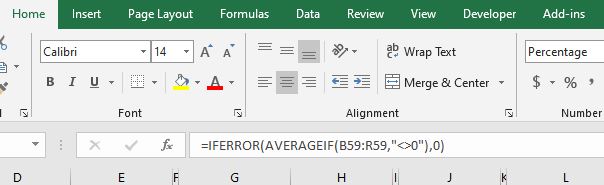
Where to enter the formula
=IFERROR(AVERAGEIF(B59:R59,"<>0"),0)
|
This sample code shows how to get rid of those pesky #DIV/0! errors that occur when a cell is empty or contains a 0 (zero).
In this example the averages of cells B59 through to R59 are averaged if they are greater than 0. This means that any values that are 0 are skipped from the calculation of the average. The critical part of the formula is the IFERROR part. This tell Excel that if there are no values or all values in the range are 0 then simply use 0 as the average.
By doing this you don't get to see the #DIV/0 error and the spreadsheet looks a lot cleaner. |
|
| |
|
|
| |
Splitting Date and Time Values |
|
|
| |
OurDate = Int(Cells(row, column).Value)
OurTime = .Cells(row, column).Value - Int(Cells(row, column).Value)
Cells(row, column).NumberFormat = "hh:mm:ss" ' Format time as hh.mm.ss
Cells(row, column).NumberFormat = "dddd dd-mmm-yy" ' Format date as weekday dd-monthname-yy |
Excel often stores date and time in a cell as a combined field. Many times we need to separate the date or the time and this code will do that.
Remember that you will need to set the cell format of any receiving cell to match the date/time values you are wanting.
Sample code for this is also shown alongside.
Note that the output format for time will be hh.mm.ss displayed as military time. |
|
| |
|
|
| |
Testing a Time Value |
|
|
| |
If TimeValue(OurTime) > TimeValue("15:30:00") Then
MsgBox "After 3:30 PM"
End If
How to drop off the seconds value
OurTime = Int(OurTime * 1440) / 1440 ' Drops off the seconds
How to round to the nearest second
OurTime = ROUND(OurTime * 1440) / 1440 ' Rounds to the nearest second
|
Following on from the above tip on splitting date and time from a cell you may want to test a time value against a time of day.
The code alongside demonstrates how to do this using the time extracted via the code above.
Also the two additional lines of code demonstrate how to drop off the seconds or round to the nearest second. |
|
| |
|
|
| |
Comparing Dates |
|
|
| |
Date1 = CDate(DateAsString1)
Date2 = CDate(DateAsString2)
If Date1 <> Date2 Then
MsgBox "Dates are not the same"
Else
MsgBox "Dates are equal"
End If
|
Here we show how to compare two dates without having to break it down into years, months etc.
The dates should be strings in the format mm/dd/yyyy. If you need to know how to split the date and time from a timestamp, please see the code above.
Note that the dates are compared to the exact day, month and year. |
|
| |
|
|
| |
Finding the Last Date of a Particular Day of the Week |
|
|
| |
Dim Previous_Weekday As Date
Dim Weekday_Name As Integer
Weekday_Name = vbMonday
Previous_Weekday = DateAdd("d", -Weekday(Now) + Weekday_Name, Now)
If Previous_Weekday > Now Then
Previous_Weekday = Previous_Weekday - Weekday_Name
End If
MsgBox "The last " & WeekdayName(Weekday_Name) & _
" was on " & Format(Previous_Weekday, "mm/dd/yyyy") & _
vbCrLf & "Today is " & Format(Date, "dddd") & " " & Date
|
Sometimes it is useful to know the date of the last date of a particular day of the week. i.e. When was the last Friday?
This code will give you that information. In the case it will tell you the date of the last Monday (vbMonday). If you want the date of another day of the week simply change vbMonday to the name of the day you want. Simply replace the "Monday" part with your desired day name.
You can, obviously, remove the MSGBOX. That is only there to prove it works! |
|
| |
|
|
| |
Formatting Minutes to Hours and Minutes |
|
|
| |
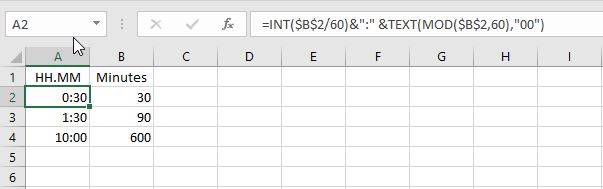
To use this in VBA code use the following:
ThisWorkbook.Sheets("yoursheet").Cells(r, c).FormulaR1C1 = "=INT($B$3/60)&":" &TEXT(MOD($B$3,60),"00")"
Obviously the bits in red need changing to your own values.
|
Here we show how to convert a field that contains just a total of minutes into hours and minutes.
Note that formula in the Cells in column A are propagated into each cell and the source cell ($B$2) is incremented by 1 row. (i.e. =INT($B$3/60)&":" &TEXT(MOD($B$3,60),"00")) |
|
|
| |
|
|
| |
Get All Files In a Folder |
|
|
| |
Dim f As Object
Dim varFile As Variant
Set f = Application.FileDialog(3)
With f
.AllowMultiSelect = True 'default
.InitialFileName = "C:\YourDefaultFolderPath\"
.Filters.Add "All Files", "*.*"
.Show
For Each varFile In .SelectedItems
MsgBox varFile
Next
End With
|
The code here demonstrates how to process all the files within a particular selected directory.
The files listed can be filtered by changing the file selection criteria (colored in red).
Obviously this code is very simplistic and it's sole purpose is to demonstrate how to perform the task of accessing all the files in a folder. |
|
| |
|
|
| |
Checking a Cell For Merged |
|
|
| |
If ThisWorkbook.Sheets("YourSheet").Cells(row, column).MergeCells = True Then
MsgBox "Merged Do something"
Else
MsgBox "Do something else"
End If |
Sometimes you need to know if a cell has been merged or not. It can really throw a VBA program for a loop if you are not expecting a merged cell and actually encounter one.
The technique next alongside will return TRUE if the cell indicated is merged and FALSE if it isn't.
Obviously you will need to change the values in red to your own values. |
|
| |
|
|
| |
Counting Rows With Non-Blank Data |
|
|
| |
Dim Max As Integer
Dim NonBlank As Integer
Dim MyRange As Range
Max = ThisWorkbook.Sheets("YourSheet").Cells(Rows.Count, YourCol).End(xlUp).Row
Set MyRange = ThisWorkbook.Sheets("YourSheet").Range("C1:C" & Max)
NonBlank = WorksheetFunction.CountA(MyRange)
Set MyRange = Nothing |
This code will return a count of how many rows are non-blank within a specified range. In this example it will check all rows in column C. The range is set to be from row 1 to the last row in column YourCol.
YourCol should be different than the column you want to count (C in this case). We would recommend that YourCol be set to one with the most rows in it. |
|
| |
|
|
| |
Removing Duplicate Rows |
|
|
| |
ThisWorkbook.Sheets("yoursheet").Cells.RemoveDuplicates Columns:=Array(1, 2, 3) |
Duplicate rows in VBA can be deleted quickly and easily with one instruction. In this example if the data in columns 1, 2 and 3 are the same on sheet "yoursheet", then row is deleted.
Note: The data in all those columns must be the same. Values in columns outside of this range are ignored!
Obviously you will need to change the values in red to your own values.
We recommend taking a backup of your sheet before you start because once deleted it is gone! |
|
| |
|
|
| |
Writing Data to the Clipboard |
|
|
| |
Function Clipboard$(Optional s$)
Dim v: v = s 'Cast to variant for 64-bit VBA support
With CreateObject("htmlfile")
With .parentWindow.clipboardData
Select Case True
Case Len(s): .setData "text", v
Case Else: Clipboard = .GetData("text")
End Select
End With
End With
End Function
To use this function code :
Clipboard ("Your text")
|
This Function wasn't actually written by us but it is a very useful function so we thought we would include it here.
The function will copy text to the clipboard. We use this for copying long numbers or strings to prevent transcription errors. For example copying a part number to the clipboard.
Text Version
|
|
| |
|
|
| |
Remove Extra Spaces From a String |
|
|
| |
Public Function RemoveExtraSpace(inVal As String) As String
With CreateObject("VBScript.RegExp")
.Pattern = "\s+"
.Global = True
RemoveExtraSpace = .Replace(inVal, " ")
End With
End Function
To use this function code :
myString = RemoveExtraSpace(myString)
|
This function will remove any excess spaces from a string passed to it as a parameter.
The function can be download from here. |
|
| |
|
|
| |
Adding a Trend Chart to a Worksheet |
|
|
| |
LastRow = Cells(Rows.Count, 2).End(xlUp).Row
ActiveSheet.Shapes.AddChart2(240, xlXYScatterLines).Select
ActiveChart.SetSourceData Source:=Range("SheetName!Range")
i.e. (SheetName!$D$2:$D" & LastRow)
ActiveChart.FullSeriesCollection(1).Trendlines.Add Type:=xlLinear, Forward _
:=0, Backward:=0, DisplayEquation:=0, DisplayRSquared:=0, Name:= _
"YourTrendName"
ActiveChart.SetSourceData Source:=Range(SheetName!Range)
ActiveChart.ChartTitle.Text = "Your Chart Title"
With ActiveSheet.Shapes("YourNameChartAreaName")
.Left = Range("A" & LastRow + 2).Left
' Where to place the left of the chart
.Top = Range("A" & LastRow + 2).Top
' Where to place the top of the chart
End With |
This code will add a trend graph to the current worksheet.
First the chart shape to be added to the sheet is selected then data source is defined. In the example in yellow the range is the data in column D
and the $2 is because the data columns have headings and the LastRow selects the entire row.
Next the Chart series collection has a trend line is added using the same range as the chart data.
A chart title is added and then, finally the chart is added to the worksheet. The position of the chart is determined by the .LEFT and .TOP. In
the example shown the chart is added 2 rows after the LastRow value and the left side of the chart starts in column A.
|
|
| |
|
|
| |
Hide All Worksheet Tabs Except One |
|
|
| |
Public Sub HideAllExcept(MySheet As String)
On Error Resume Next
X = Application.Sheets.Count
For i = 1 To X
If Application.Sheets(i).Name <> "Dashboard" Then ' Do not hide the dashboard
If Application.Sheets(i).Name <> MySheet Then
Application.Sheets(i).Visible = xlSheetHidden
End If
End If
Next i
End Sub |
This subroutine will hide all of the worksheet tabs except the one named in the passed string.
Please note that in this example, and indeed in the download itself, we also never hide the sheet named "Dashboard".
Remember that if you tweak the subroutine and try and hide all the worksheet tabs Excel will object as at least one worksheet has to be visible.
|
|
| |
|
|
| |
Getting the Last Word of a String |
|
|
| |
LastWord = Right(InputString, Len(InputString) - (InStrRev(InputString, " ")))
|
This sample code shows how to get the last word of a string.
Now we understand that there are many ways of achieving this but we use this way as it does not require hard coding length, numbers of words etc. and can be done in one line. |
|
| |
|
|