Sometimes you may want to email some information from an Excel worksheet to
people without actually emailing the whole workbook.
You could, of course, use copy and paste or even screen print to do this but
there is also a way to email it directly from Excel itself by using VBA to
draft and send the email. This could be programmed to happen automatically
without any interaction saving time and effort.
This page will step you through the basics of how to do this.
Enjoy!
As usual, the normal
disclaimers apply.
| Activate the Developer Tab
|
|
|
The first step is to activate the developer tab in Excel if it is not
already there.
There are two ways of achieving this:
|
- If you want to permanently have the developer tab available you can do
this by following the directions in the video above.
-
The other method is to press "ALT"+"F11" at the same time. Remember
that your keyboard may also require you to press the "fn" key also.
Either of these methods should open the "Developer" screen.
| Add The Outlook Object Library Reference
|
|
|
The next thing you need to do is to make sure that the "Microsoft
Outlook 16.0 Object Library" reference is added to Excel.
The video alongside demonstrates how to do this but if you
prefer here are the step by step instructions.
|
- Navigate to the "Developer Tab" and click on the "Visual Basic" button.
(this is usually the leftmost button on the "Developer" task bar)
- Click on the "Tools" button.
- Click on "References" on the Tools drop down
- Find the entry for "Microsoft Outlook 16.0 Object Library" and click on
the check box to activate it.(If it is already checked then you do not need
to do anything else.)
You are now all set to begin coding.
|
Define an Instance of the Outlook Application
|
Dim Email As
Outlook.Application
Set Email = New
Outlook.Application
|
The first thing we need to do is declare a new instance of the Outlook
application.
In this case we have used the name "Email".
|
|
Define a New Email Item
|
Dim EmailMSG As
Outlook.MailItem
Set EmailMSG =
Email.CreateItem(olMailItem)
|
The next thing we need to do is declare a new email item so we can build
the email itself.
In this case we have used the name "EmailMSG".
|
Note that the word in red should be the same as the item declared in the
previous step.
In this case we have used the name "Email".
|
Construct Your Email Headers
|
EmailMSG.To = "Who.To@Where.com"
' Who to send it to
EmailMSG.CC = ""
' Who to carbon copy
EmailMSG.BCC = ""
' Who to blind carbon copy
EmailMSG.Subject = "Snappy Title"
' Subject of email
|
The next step is to construct your email headers.
The headers are used to direct the email in the usual way. The format is
exactly as you would construct the email in Outlook.
If you want to send the email to more than one recipient, then you need to
separate them using a semi-colon (;).
If any of the email addresses are not in your Outlook Address Book the
email send will fail.
You will need to have set up your Outlook Address Book or Excel will
enter a setup dialogue.
|
|
Construct Your Email
|
EmailMSG
.Body = "Hi," & vbNewLine & vbNewLine & "Testing" & vbNewLine &
"Regards," & vbNewLine & "Kevin"
' Your message
or
EmailMSG.HTMLBody =
"Hi,<br><br>Testing<br>Regards,<br>Kevin"
' Your message
EmailMSG.Attachments.Add = ThisWorkbook.FullName
' Attach this workbook
|
Constructing the body of the email is pretty straightforward, however,
you do have options on how to do it.
If you want to send an attachment, then set the .Attachment.Add to
the name of the file to attach.
When setting the body of the email you need to consider which of two
methods to use. You can use .Body and use VBA variables like
vbNewLine, or you can use .HTMLBody and use standard HTML
to construct the email.
.Body
will override .HTMLBody
|
|
Send Your Email
|
EmailMSG.Send
' Send the email
|
To send the email it really could not be any simpler .... you use
EmailMSG.Send
You will not get any confirmation returned.
|
That is all there is to it.
If you want a sample workbook along with the working email code, then it is
available from the link above.
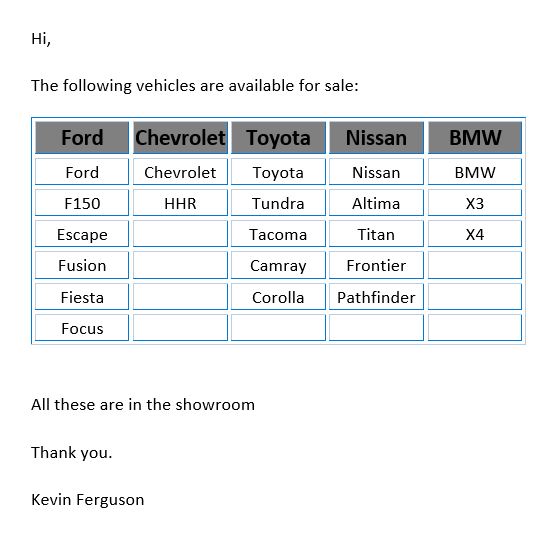
The output from this sample workbook should look like this in your email:
If you need any support or assistance with any of the code on this site
or
if you would just like to contact us, please
click here

Follow us on Facebook

