Keeping track of the value of your stock portfolio is often not easy.
Using our free Excel™ spreadsheet makes keeping tabs on your
stock easy and saves you time and effort.
The spreadsheet uses the standard Excel function, StockHistory which
pulls information from the Stock Market, but it is not exactly intuitive.
In fact it is about as user friendly as a cornered rat as it uses switches
to determine the values to be returned.
The Stock Portfolio spreadsheet is a macro-enabled spreadsheet and
must be saved as an xlsm file. We guarantee that the
file is 100% safe. There is no malicious code within it.
Enjoy!
As usual, the normal
disclaimers apply.
A video of using the spreadsheet is available on Youtube™ here.
Description
The Stock Portfolio spreadsheet will help you keep track of your stock investments by holding the information on a single worksheet. You only need to enter three pieces of information and this is done via a pop-up screen.
The spreadsheet is comprised of three user forms, four worksheets (of which only one is visible) and some modules. All of the code is password protected.
When you first open up the spreadsheet, you may be prompted to enable macros. Please do so as without this the spreadsheet will be worthless. The message looks like:
Once macros are enabled you can begin using the spreadsheet.
The worksheet (Stock Portfolio) has code behind it that is only executed when an empty cell is clicked into if that cell is in column 1 (Column A).
The first three columns are filled in from the pop-up form that gets displayed when the cell is clicked. Columns D through H are automatically calculated by the code and will get overwritten if data is in them. All other columns are left untouched.
When you click into an empty cell in column 1(A) a screen will pop-up. Initially the screen will look like:
.png) |
The
Stock Code list box contains all the stock ticker codes in use
by the New York Stock Exchange (NYSE). This list is populated from
a hidden worksheet. It is hidden in order to prevent inadvertent
corruption.
To select a stock you can either:
|
When the desired stock code has been selected the pop-up screen will be updated to look like:
.png) |
You
will now see that the stock code listbox has gone and the
selected stock is displayed next to the "Stock Code" label. You
will also see that the stock name is displayed alongside the
stock code.
You will also see that the "Number of Stocks" label and text entry box is now displayed. This is where you enter the number of stocks of that code that you have. The number of stocks value must be a whole number. |
Once the number of stocks has been entered, pop-up screen will be updated to look like:
.png) |
Notice that
the date field is filled in with the current date in the format
dd mmm yyyy.
Notice also that the "Add" button is now available. The date can be over typed but it must be in the format dd mmm yyyy and it cannot be a future date. You can also use the "Select Start Date" to display a date selection panel. |
Once all the fields on the pop-up form are filled in, click on the "Add" button.
You should now see the stock added to the "Stock Portfolio" worksheet.
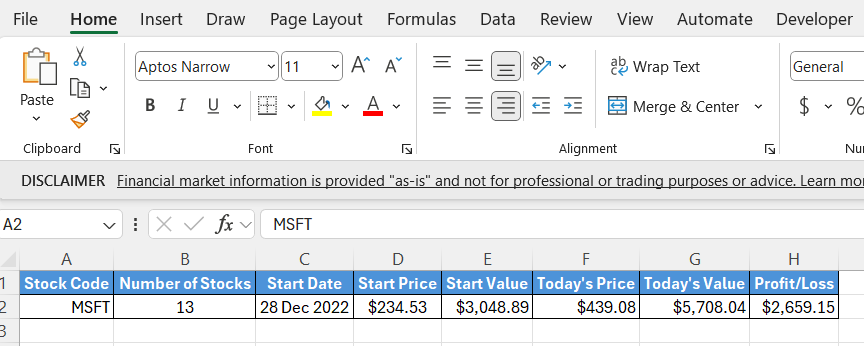
If the start date falls on a weekend, or a public holiday, the date will be rolled back to the last trading day before the entered date. Note also that the remaining columns in the row have been calculated up to the date of the last trading day prior to the current day.
You can add as many stocks onto the worksheet as you like, even the same stock code.
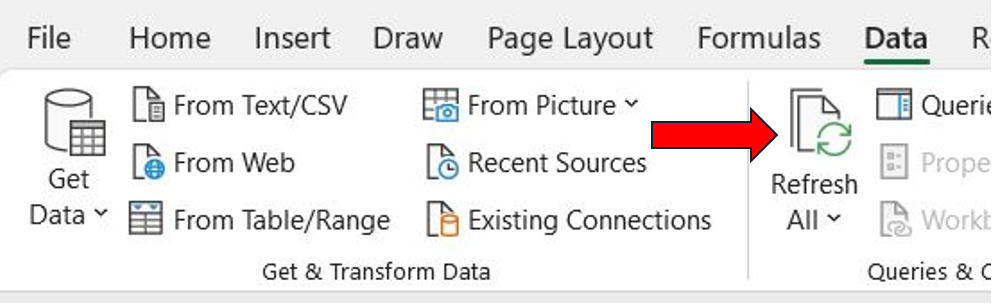
Every time you open the spreadsheet, the stock values and prices will be recalculated. If you want/need to have the spreadsheet recalculate without having to close and reopen the file then click on the "Refresh All" option under the data tag.
A video of using the spreadsheet is available on Youtube™ here.


