As ever, you use this free program at your own risk.
Feel free to use the free software on this site but please honor the copyright.
Sometimes you may want to group worksheets within a workbook and display just
that group. You could, of course, split them into separate workbooks to achieve
this, but that could separate the information from the data or the code that
produces the data.
This page will provide a code (and a complete workbook) that will demonstrate
how to accomplish displaying worksheets depending on the worksheet tab color.
A full working copy of a workbook that utilizes this technique can be found by
clicking the button below:
In order to implement this process you will need to have 2 Userforms and 2 Functions defined.
There will also be a requirement to code a statement for when the Workbook is initially opened.
All the required coding and userforms are available by following the appropriate links below.
Enjoy!
As normal the usual disclaimers apply.
Activate the Developer Tab
You will need to ensure that the "Developer" tab is available on your Excel ribbon.
The first step is to activate the developer tab in Excel if it is not already there.
There are two ways of achieving this.
- If you want to permanently have the developer tab available you can do this by following the directions in the video
- The other method is to press "ALT"+"F11" at the same time. Remember that your keyboard may also require you to press the "fn" key also.
Either of these methods should open the "Developer" screen.
A YouTube™ video on how to activate the "Developer" tab is available by clicking on the button below.
Download the Zip file Containing the Userforms
The first thing to do is to import the userform Zip file containing the Userforms (ListDrop & ResetUser) is linked to by the button below.
Create the Required Worksheets
You will need at least two worksheets in your workbook. These must be named $$$Info & $$$Control unless you change the code in the userforms.
$$$Info is used to provide instructions on how to use the facility and provide a "default" worksheet in case no other worksheet meets the selection criteria. The color of the $$$Info tab is irrelevant for the purpose of being the "default" worksheet.
$$$Control is used to hold the control table used to populate the worksheet selection form. The table can be in any location but it must have the column heading Color (case sensitive) to indicate the start of the table. The column immediately after this heading is where the description will be picked up from.
Note: If you change any of the names you will need to reflect those changes
in the VBA code of the userforms.
Add the Required Functions
|
Public Function
myTabColor
As Integer
MyTabColor = Application.Sheets(ActiveSheet.Name). Tab.ColorIndex End Function The above function is available for download by clicking the button below The SheetCount is available by clicking the button below |
There are 2 functions that need to be coded for the process to work.
These are: SheetCount &
myTabColor
myTabColor is just one line and so it is shown to the left. This function will return, as an integer, the color index number of the currently active sheet. SheetCount is available for download from the link on the left. It is used to count the number of hidden sheets to make sure that there is always one sheet visible. |
|
|
|
| Add Code To Show Userform When Workbook is Opened | |
|
Private Sub Workbook_Open() ListDrop.Show vbApplicationModal End Sub |
In order that the form selection sheet is shown when the workbook opens you will need to add the code alongside to the ThisWorkbook Excel Objects in the developer window. |
|
|
|
Clicking the button below will take you to a YouTube video that demonstrates a free working example of selecting tabs based on the color of the tabs.
Usage Instructions
The technique, as mentioned here, relies of there being a correctly formatted control table on the $$$Control worksheet. This table must have a column with the word Color in it. The column can be anywhere on the worksheet and the column should be used to supply the ColorIndex number to be used for a group of worksheets. The column next to the "Color" column should be used to describe the worksheets.
An example of the control table is:

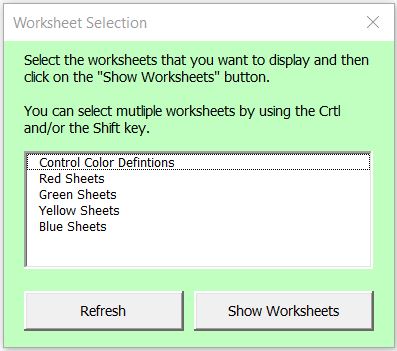
Once the control table is built you will need to reload the "Worksheet Selection Form". This is accomplished by clicking on the "Refresh" button on the form. An example of the "Worksheet Selection Form" is:
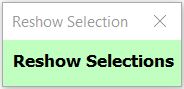
If you close the "Worksheet Selection Form" another modal form will be displayed that will allow you to restore it. This is the "Reshow Selection" form and it is small enough to not interfere with the displayed worksheets. As it is a modal form it can be dragged and dropped to any location.
The "Reshow Selection" form looks like:
Just click on the form and the "Worksheet Selection Form" will be redisplayed.


