As ever, you use this free Rexx code at your own risk.
Feel free to use the free software on this site but please honor the copyright.
This page is discusses how to define MQ objects on a z/OS systems in order
to establish channel triggering but the same principles apply to all
WebSphereMQ platforms.
To use the definitions on other platforms you will need to use the RUNMQSC
program for executing the commands.
The intent of this page is to provide the definitions required to establish a
triggered sender and receiver channel pairs between two queue managers and to
give a simple 'round trip' mechanism to prove the definitions have worked
successfully.
This page will assume that TCP/IP is the network protocol in use but the
principal applies to other network protocols.
The definitions that will be given are fairly basic, it is up to you to ensure
that you follow your site standards for things like security (MCAUSER) etc.
Why Trigger Channels?
Regardless of how you start channels, the simple fact remains that they must get started in order for messages to flow across them.
Another advantage of triggering channels is the fact that they will stop if there is no message traffic. This is important as the longer a channel is active the higher the risk potential hacking.
In a large WebSphereMQ network, automating the startup of channels becomes almost essential. Without using triggered channels, a significant effort in custom automation may be required. Given that WebSphereMQ may be running across many different platforms this may involve the use of several automation products to automate the starting, and stopping, of channels.
Coordinating this automation may also be a substantial undertaking.
Contrast this with triggered channels. Channel initiators exist on most WebSphereMQ platforms and the definitions to control their execution are common to most WebSphereMQ platforms.
Finally, and perhaps most significantly there is no custom coding required to implement triggering channels.
Customizing the Sample Code
The sample code is provided with a REXX Exec (named CUSTOM) that will customize the supplied JCL with your values.
The JCL dataset is distributed in TSO Transmitted format and comprises of 6 members. These members are:
Member |
Description |
| ASLINS01 |
This is an ISPF Prepped panel used by member CUSTOM to allow the user to enter
the values for the JCL members to use for the relevant names.
This member can be deleted once the JCL has been customized. |
|
|
|
| CUSTOM |
This is the customization EXEC. It changes the supplied JCL to use your site
values. This EXEC can be skipped, but then manual editing of the supplied
members will be needed.
This member can be deleted once the JCL has been customized. |
|
|
|
| DEFCHAN |
This the JCL for actually defining the required WebSphereMQ objects for creating
triggered channel pairs. It is actually 2 jobs but if the two Queue Managers
are running on the same z/OS image it can be run as a two step job.
The definitions created here can also be separated to run on 2 different LPARS to create the channel pairs. If one end of the channel pair is on a different platform the definitions can cut and pasted onto that platform and then piped into RUNMQSC and the objects will be created. |
|
|
|
| DEFQUES | This job is an optional job, however, it can be used to create the required 'test' queues to prove the connections between the queue managers is functioning correctly. Similar to the DEFCHAN job, this member is 2 jobs and can be run in the same manner as the DEFCHAN jobs. |
|
|
|
| ECHO |
This JCL will execute the supplied, free QECHO program.
QECHO simply reads a message from the input queue and writes that same message back to the reply queue. More details on the QECHO program can be found here. |
|
|
|
| PUT |
This JCL will execute the supplied, free QPUT program.
QECHO QPUT will simply read cards from the SYSIN stream and put them onto a Queue. It will then wait for a reply. More details on the QPUT program can be found here. |
|
|
|
Theoretically you only need to examine and change the DEFCHAN member to establish two way channel communication between two Queue Managers. Indeed, you can even just copy the WebSpehereMQ Object definitions and they should work.
Important Reminders
- Remember that the case of the Objects matter with WebSphereMQ. If a name consists of upper and lower case letters, then they must exactly match in the definitions for both ends.
- The Process definition in these jobs is platform specific. In other words it is for z/OS only, however, the good news is that on other platforms it is not as picky on what you name the process.
- The supplied CUSTOM Rexx exec will overwrite the distributed members so if you want to keep the original members we recommend taking a backup before running the CUSTOM exec.
- On z/OS Queue Manager names are limited to 4 characters in length and should be in upper case. The CUSTOM exec allows for more than 4 characters simply so that you can define a name for a different platform.
Installation
This feature comprises of 2 datasets. One is a load library that contains the two programs QECHO and QUEPUT that are needed if you want to run the ECHO and PUT JCL members to test the end-to-end message flow of your channels after the channels have been defined. The other contains the JCL members detailed above.
If you don't want to run the ECHO or PUT jobs, then you do not need to download the load library.
Link |
Description |
| This is the link to the DEFCHAN JCL dataset in TSO TRANSMIT (XMIT) format. | |
|
|
|
|
This is the link to the load library dataset in TSO TRANSMIT (XMIT) format
that contains the 2 programs, QECHO & QUEPUT.
These are used by the ECHO & PUT respectively. |
|
|
|
|
As both these files are TSO TRANSMIT files they should be transferred to the z/OS system using a file transfer program. The files must be transferred as BINARY files. They should also be transferred as fixed blocked, 80 byte files.
Once the files are on z/OS they will have to be received. To do this you use the TSO RECEIVE command. Please refer to the IBM RECEIVE command for details on the use of this TSO command.
Once the DEFCHAN JCL file has been RECEIVED you can execute the CUSTOM exec by entering:
TSO ex 'your.received.dataset.name(CUSTOM)'
This will display the following screen:
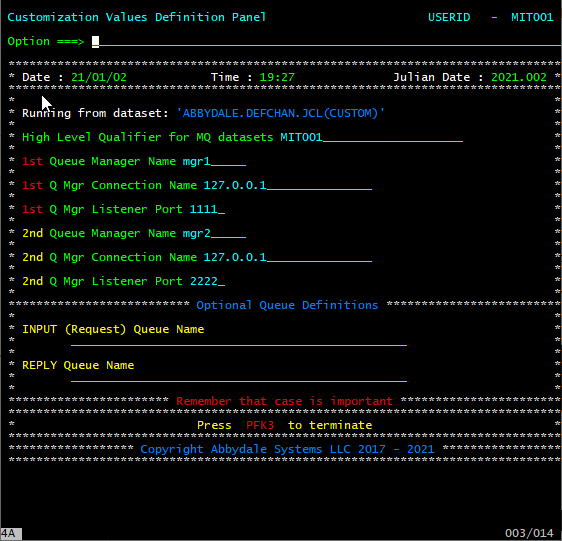
From this panel you fill in the appropriate site values and press enter.
The remaining job members should then be customized to your site standards.
This material has been used successfully by Abbydale Systems LLC. and to the best of our knowledge this material and any system(s) of which it is a part are operational as of the service level or date stated in the body of this material (if so stated). However, NO warranty is given or implied as to the accuracy of this material or any related material or systems, and no responsibility is assumed for any effect or modification directly or indirectly caused by the use of this material.
It is the responsibility of any user of this material to evaluate its usefulness to the user's environment.
Abbydale Systems LLC. does not guarantee to keep this or any related material current, nor does it guarantee to provide any corrections or extensions described by any users of this material or any corrections or extensions made in the future by Abbydale Systems LLC. itself.


